About 6 months ago, Kaylee discovered a company called Hearts For Hearts that makes some very cute dolls. They represent girls from around the world and part of the proceeds of each purchase goes to World Vision, a Christian humanitarian-aid group.
We decided to invest in Tipi (from Laos), Zelia (from Brazil), and Dell (from the US) as Christmas gifts for the girls. My cousin Alexis brought them down in October when she came to visit us for three months. We spent that time setting them up with a little house.
While Kaylee made mattresses, quilts, and pillows, and extra clothes, I made beds.
We also picked up a to-scale oven, kitchenware, and dressers at the Feria de Alasitas, an annual fair that specializes in miniatures. Kaylee made walls out of cardboard, wrapping paper, and a few goodies.
This is actually something I built back in September, that I wanted to share and write a little bit about.
Because of several factors, our house is always dirty: we live in a dirty city, the windows are very drafty, and we get lots of wind. For that reason, I wanted to be able to protect some of my electronic office equipment from the dirt. However, you can't just put them in a box, or they'll overheat. But unfiltered ventilation is just as bad. So here's what I did:
I started with a wooden box that I purchased in the Cancha (same as in the dehydrator project) for 150Bs ($21.83).
Again, the Dremel 400XPR that I brought from the US came in very handy (shown with circle-cutter).
I cut a hole a rectangular hole in one end and set in an air filter (for a Toyota Corolla) for which I paid 38Bs ($5.53).
In the other end, I cut a circular hole, stuck on some screen (to keep little fingers out!).
The 6" computer fan cost 25Bs ($3.64). The power supply for it was 35Bs ($5.09). The power strip was a burned up unit I picked up for free from another missionary, which I then gutted and reworked.
I used some wood scraps to make a rack in the lid for paper storage.
Now our backup hard drive, wireless router, battery charger, and Vonage phone adapter live in clean comfort, with plenty of room for more, all for the low price of $31! The interface cables are passed through notches in the wall of the box.
I keep an indoor/outdoor thermometer on it to monitor the interior temperature. So far, it's doing great!
When I was a kid, my dad made a dehydrator for my mom. No, not one of those cute little plastic things that goes on your counter, it was a humongous plywood box on wheels. It measured somewhere in the neighborhood of 2' x 2' x 4' long, with a door on the end and 5 or 6 wood-framed screen trays inside. It was powered by an ordinary space heater that pushed the warm scent of drying bananas, apples, pears, plums, and herbs throughout the house.
Here in Cochabamba, we have a ton of fruit, when it's in season. We can get tons of bananas all year (we make lots of smoothies), and typically have oranges and papayas as well. Seasonal fruits are: apples, peaches, plums, grapes, watermelons, etc.
So, in order to use up more bananas (I love dried bananas) and to preserve fruit so we can enjoy it out of season, I decided to modify my dad's design and made a dehydrator for my wife for Christmas.
I started with a plain wood box that I bought in the Cancha (our huge, open-air market). I've been told that they are mostly used by the military as foot lockers.
Because my box was pre-made, I couldn't dado in slots for the trays (like my dad did), so I made cleats. The trays are made of screen nailed and siliconed to wood frames. Other than the box, all of the wood is scrap that I had laying around.
I had to rip down the boards I had, so I made a table saw for this project:
I used my Dremel with the circle cutter attachment to cut two holes in the lid, where I mounted two 6" computer fans.
To keep little fingers and bugs out, I put a piece of screen (with silicone) over the holes and covered it with vinyl, left over from the Pony Project.
I used a spade bit to drill ventilation/outlet holes in the top of the box and covered them with screen as well.
I modified a variable-output AC-DC converter, removing the pins and soldering the supply wire directly into the board, through the holes in the case.
This was then connected to the fans and mounted in the box.
Because the "lid" was now a "door," I had to upgrade the hinges and mount the handle on the (new) top.
Did I mention that most of this took place on the Dec 24th, in between coats of polyurethane on the Christmas Ponies? It was done in time to go under the tree!
The only thing it lacked was heat. I wanted to try it out without, so I gave it a rack of bananas, but it took a couple days to dry them out. So I was thinking about heating options and my brother suggested a light bulb. So I added a 100W bulb, and bananas finish in less than 12 hours. It glows in the dark nicely, too.
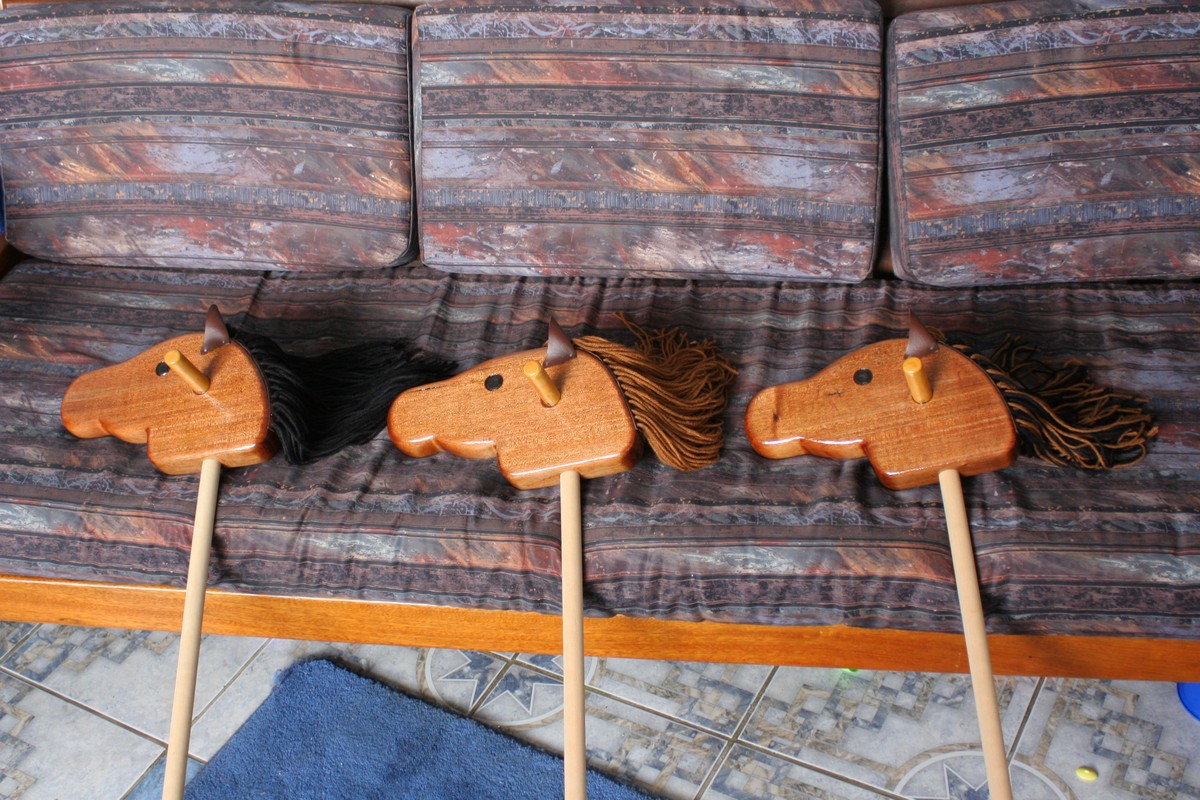
At the end of my first pony post, I had the heads cut and shaped the way I wanted with the rasp. From there, I sanded them with 80, 100, and 150 grit paper, and drilled the holes for handles and sticks.
I first drilled a 5/32" pilot hole all the way through, so I could drill from both sides with the spade bit, to avoid splitting out the exit hole.
I then fitted the handles. I had to overdrill the holes a touch, so I nailed the handles in from the underside, then filled the gap with Bolivian wood putty - sawdust and glue.
I still hadn't decided what to do about the eyes. I originally planned to carve them in the sunk relief style. My wife suggested buying black marbles and fitting them, but I never got around to buying black marbles. I did, however, on a hardware run, find some cheap woodcarving chisels:
So, I ended up doing it the way I had thought originally:
Blackened with a Sharpie:
I should mention: this eye carving business was happening late at night on the 22nd and I was running out of time! They got their first coat of polyurethane around 1:00am on the 23rd:
In the morning, I gave them a quick sand with 220 grit paper and gave them another coat. Meanwhile, I was working on their manes. I made their scalps from brown vinyl I had found for the purpose, punched holes in it, looped yarn through, then secured the loops underneath. Before attaching to the heads, I coated the underside with glue to stiffen the yarn and lock it together as well as stick it to the wood.
Yes, that's Egg Nog and coffee (or Coffee Nog, as it's commonly known) in that cup. :)
I then used 1/2" nails to attach the scalps to the heads:
I made ears out of the same material, and darkened the insides with a marker:
The ears were also attached with 1/2" nails:
I then cut the forelock, and they're ready to go!!
Ready for wrapping (black garbage sacks), Christmas Eve:
Custom-fitted, Christmas morning:
The 2 lb head is a bit much for Lydia, so she needs help, but she'll grow into it:
It has been 10 months since we moved to Bolivia. Due largely to luggage constraints, I left the vast majority of my tools in Montana. I have been slowly accumulating woodworking tools, but to this point haven't used them for anything worthy of mention.
I grew up with woodcarving. When I was a kid, my dad had a woodshop in the basement of our house. I spent a lot of time there, mostly working with handtools. My favorite was the drawknife. I remember carving a boat out of a chunk of 2x6 with it when I was 10 or so, and a very crude snowboard at age 13, among other things. I worked my way through Bible college and mission training as a carpenter, but mostly doing framing, remodeling, and finish work. Finally, I have a reason to shape wood again.
My daughters (at least, the older two) love horses. Two years ago, Addi got a little rocking horse for Christmas, and we found Anne a stick horse shortly thereafter. Like my tools, they, too, had to stay in Montana. So I decided to make stick horses for all three of them.
I bought a chunk of native mahogany from a carpenter that has a shop down the street. It measured 36.5" x 7.5" x 1.625" and weighed 12 lbs. I paid 40 Bolivianos (currently $5.80).
Getting the pattern right was the hardest part. I'm certainly not a drawer. My wife told me the first one looked more like a Great Dane:
I figured I could easily find such a simple, useful tool as a drawknife here, but I was wrong. Instead, I used a combination of Skilsaw, backsaw, hand axe, rasp, spokeshave to carve out the heads:
From there, I'll let you just look at the photos (click to see full-size):
I also made a time-lapse video of 32 minutes of shaping (from rough cut to sand-ready), compressed to 3 minutes: