Showing posts with label Stick Horse. Show all posts

Friday, December 23, 2011

Project: Christmas Ponies (Part 2)

At the end of my first pony post, I had the heads cut and shaped the way I wanted with the rasp.  From there, I sanded them with 80, 100, and 150 grit paper, and drilled the holes for handles and sticks.

I first drilled a 5/32" pilot hole all the way through, so I could drill from both sides with the spade bit, to avoid splitting out the exit hole.

I then fitted the handles.  I had to overdrill the holes a touch, so I nailed the handles in from the underside, then filled the gap with Bolivian wood putty - sawdust and glue.

I still hadn't decided what to do about the eyes.  I originally planned to carve them in the sunk relief style.  My wife suggested buying black marbles and fitting them, but I never got around to buying black marbles.  I did, however, on a hardware run, find some cheap woodcarving chisels:

So, I ended up doing it the way I had thought originally:
Blackened with a Sharpie:

I should mention:  this eye carving business was happening late at night on the 22nd and I was running out of time!  They got their first coat of polyurethane around 1:00am on the 23rd:


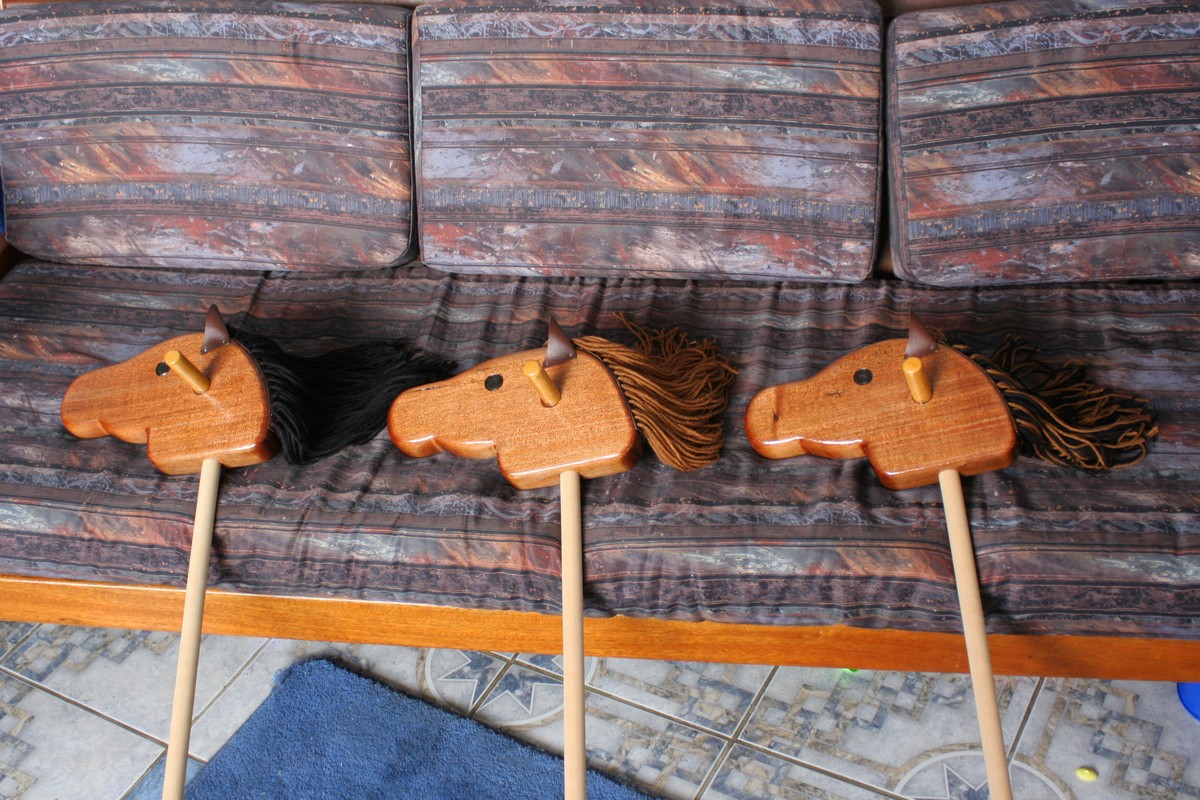
In the morning, I gave them a quick sand with 220 grit paper and gave them another coat.  Meanwhile, I was working on their manes.  I made their scalps from brown vinyl I had found for the purpose, punched holes in it, looped yarn through, then secured the loops underneath.  Before attaching to the heads, I coated the underside with glue to stiffen the yarn and lock it together as well as stick it to the wood.

Yes, that's Egg Nog and coffee (or Coffee Nog, as it's commonly known) in that cup. :)

I then used 1/2" nails to attach the scalps to the heads:

I made ears out of the same material, and darkened the insides with a marker:

The ears were also attached with 1/2" nails:

I then cut the forelock, and they're ready to go!!


Ready for wrapping (black garbage sacks), Christmas Eve:

Custom-fitted, Christmas morning:


The 2 lb head is a bit much for Lydia, so she needs help, but she'll grow into it:

As usual, the rest of the photos are here: Picasa Web Albums - The Tinker Thinker

Sunday, December 11, 2011

Project: Christmas Ponies (Part 1)

It has been 10 months since we moved to Bolivia.  Due largely to luggage constraints, I left the vast majority of my tools in Montana.  I have been slowly accumulating woodworking tools, but to this point haven't used them for anything worthy of mention.

I grew up with woodcarving.  When I was a kid, my dad had a woodshop in the basement of our house.  I spent a lot of time there, mostly working with handtools.  My favorite was the drawknife.  I remember carving a boat out of a chunk of 2x6 with it when I was 10 or so, and a very crude snowboard at age 13, among other things.  I worked my way through Bible college and mission training as a carpenter, but mostly doing framing, remodeling, and finish work.  Finally, I have a reason to shape wood again.

My daughters (at least, the older two) love horses.  Two years ago, Addi got a little rocking horse for Christmas, and we found Anne a stick horse shortly thereafter.  Like my tools, they, too, had to stay in Montana.  So I decided to make stick horses for all three of them.

I bought a chunk of native mahogany from a carpenter that has a shop down the street.  It measured 36.5" x 7.5" x 1.625" and weighed 12 lbs.  I paid 40 Bolivianos (currently $5.80).


Getting the pattern right was the hardest part.  I'm certainly not a drawer.  My wife told me the first one looked more like a Great Dane:


I figured I could easily find such a simple, useful tool as a drawknife here, but I was wrong.  Instead, I used a combination of Skilsaw, backsaw, hand axe, rasp, spokeshave to carve out the heads:


From there, I'll let you just look at the photos (click to see full-size):


I also made a time-lapse video of 32 minutes of shaping (from rough cut to sand-ready), compressed to 3 minutes: